
Installing more security cameras does not automatically make a facility safer. Without thoughtful security camera placement, systems often waste coverage on low-risk areas while leaving critical blind spots at entrances, corridors, and high-value assets. Effective security camera placement is driven by risk assessment, traffic patterns, lighting conditions, and the specific details the footage must capture to support investigations and incident prevention.
In this article, business owners, facility managers, and security professionals will learn a practical framework for planning camera locations, setting angles and fields of view for maximum coverage, and validating performance through real-world testing and ongoing review.
Start With Risk, Not Hardware
Effective camera layouts are built around a clear understanding of risk, not around a catalog of hardware options. When you start by analyzing where your business can actually lose money, productivity, or reputation, every camera you install has a defined purpose and measurable value.
Identify Critical Assets and Operations
Before choosing locations, look at how your facility really runs and where a failure would hurt most.
- Map entrances, exits, and public‑to‑private transition points.
- Flag cash handling points such as POS counters, safes, and counting rooms.
- Identify docks, shipping/receiving bays, and staging areas where inventory is exposed.
- Note server rooms, file storage, and executive offices holding sensitive data or decisions.
Define Security Objectives for Each Zone
Give every camera view a specific job so you avoid “nice‑looking” but useless footage.
- Decide where you need clear ID of faces, plates, or badges.
- Mark zones focused on activity monitoring and procedure compliance.
- Reserve some views for general situational awareness in lobbies, floors, or parking areas.
- In high‑risk spots, pair a tight identification shot with a wider contextual view.
Core Principles of Effective Camera Coverage

Effective coverage depends on how each camera works with the others to create a continuous, useful record of what actually happens in your facility.
Avoid blind spots and coverage gaps
- Overlap camera views at hallways, stairwells, and doorways to track movement between areas
- Treat entrances and corridor junctions as choke points covered from multiple angles
- Map coverage zones on floor plans before installation
- Walk the space to identify blind corners or obstructions
Control distance, angle, and height
- Mount cameras high enough to prevent tampering while maintaining facial detail
- Angle cameras into the direction of movement, not straight down
- Avoid steep overhead views at doors and counters
- Test visibility at real-world distances before final placement
Light, glare, and dynamic range
- Avoid aiming cameras toward windows or bright light sources
- Position lighting behind the camera whenever possible
- Use WDR cameras in areas with mixed lighting
- Verify camera views at different times of day
Security Camera Placement Strategies by Area of the Facility
Different areas of a facility face different risks, so camera placement should follow the way people and vehicles actually approach, enter, and move through the site.
Exterior Perimeter and Parking Areas
- Prioritize entry roads, parking entrances, and other vehicle choke points so you can reliably capture license plates, vehicle characteristics, and direction of travel as they enter and leave.
- Cover pedestrian and vehicle approach paths to the building itself, not just the doors, making sure walkways and drive lanes are visible and supported by adequate lighting.
- Coordinate camera placement with existing light poles, canopy lights, and building-mounted fixtures to minimize dark zones and avoid casting shadows that hide faces or plates.
- Aim cameras to reduce backlighting from streetlights and headlights—for example, positioning them slightly off-axis so approaching vehicles and people are lit rather than silhouetted.
Building Entrances and Exits
- Position cameras at main entrances and exits to capture clear, front-facing views of people as they pass through, rather than relying only on high, top‑down lobby shots.
- Apply a “funnel” approach by pairing a wide-angle lobby camera for context with a tighter doorway camera dedicated to facial identification and badge use.
- In glass vestibules, account for reflections and glare by angling cameras away from large panes and using models that handle strong backlighting.
- For revolving doors, turnstiles, and secured portals, frame views so that both the person and the barrier mechanism are visible, making it easier to confirm who actually passed through.
Interior High‑Risk Zones
- In cash handling zones, POS terminals, safes, and high‑value storage, use close-range views that clearly show faces, hands, and the exchange or movement of items.
- Treat loading docks and shipping/receiving as a single workflow, covering exterior truck bays, ramps, dock doors, and adjacent interior staging areas in one continuous visual path.
- For sensitive rooms such as IT/server spaces, records storage, and R&D areas, place cameras both on the door and along the approach corridor to capture who came, who hesitated, and who actually entered.
- Ensure recording settings and retention are adequate in these zones, since they often generate footage needed for investigations, audits, or internal reviews.
Corridors, Stairwells, and Elevators
- Place cameras at corridor intersections and along long hallways, using corridor-mode or appropriately chosen varifocal lenses to concentrate resolution on the length of travel rather than blank walls.
- Recognize stairwells as common escape routes and blind spots; position cameras to see both the doors on each level and the landings where people pause or change direction.
- Decide intentionally whether to place cameras inside elevator cabs, outside in elevator lobbies, or both, based on risk level and privacy expectations.
- Integrate elevator and corridor camera views with access control logs and elevator controller data so you can quickly match card swipes or floor selections to specific individuals on video.
Balancing Visibility, Deterrence, and Discretion
The way cameras are presented in a space is just as important as where they are aimed, because visibility influences both behavior and how people feel about being monitored.
When cameras should be highly visible
Visible cameras and signage can deter theft and misconduct before incidents occur. Placing them at entrances, loading docks, cash areas, and main corridors clearly signals monitoring in locations where security is expected—reinforcing safety without creating an intrusive atmosphere.
When discretion is more appropriate
In executive offices, customer-facing spaces, and areas where aesthetics matter, discreet or blended cameras are often more appropriate. In semi-private spaces, subtle placement and clear communication help maintain trust. Sensitive areas such as restrooms or changing rooms should never be monitored and are secured through access control, design, and policy instead.
Testing, Fine‑Tuning, and Ongoing Review
Even a well‑designed camera layout needs real‑world testing and periodic adjustment to stay effective as the facility evolves.
Field testing before sign‑off
- Conduct walk‑throughs during both day and night, evaluating recorded clips instead of relying only on live views.
- Confirm that faces, license plates, labels, and badge reads are clearly visible at the actual distances where people and vehicles move.
- Test typical incident scenarios—such as tailgating at doors or unauthorized access attempts—to see whether cameras capture enough detail to support decisions.
- Document any weak angles or dark spots discovered during testing and adjust camera positions, lenses, or lighting before calling the project complete.
Adjusting as operations change
- Recognize that new shelving, machinery, walls, or office layouts can create fresh blind spots that did not exist in the original design.
- Update camera positions when workflows or access routes change so footage still follows how people and goods actually move.
- Schedule periodic reviews with facilities, security, and operations leaders to compare current risks with existing coverage.
- Use findings from incidents, near‑misses, and internal audits to prioritize small re‑aims, additions, or upgrades that keep the system aligned with business needs.
Common Mistakes to Avoid
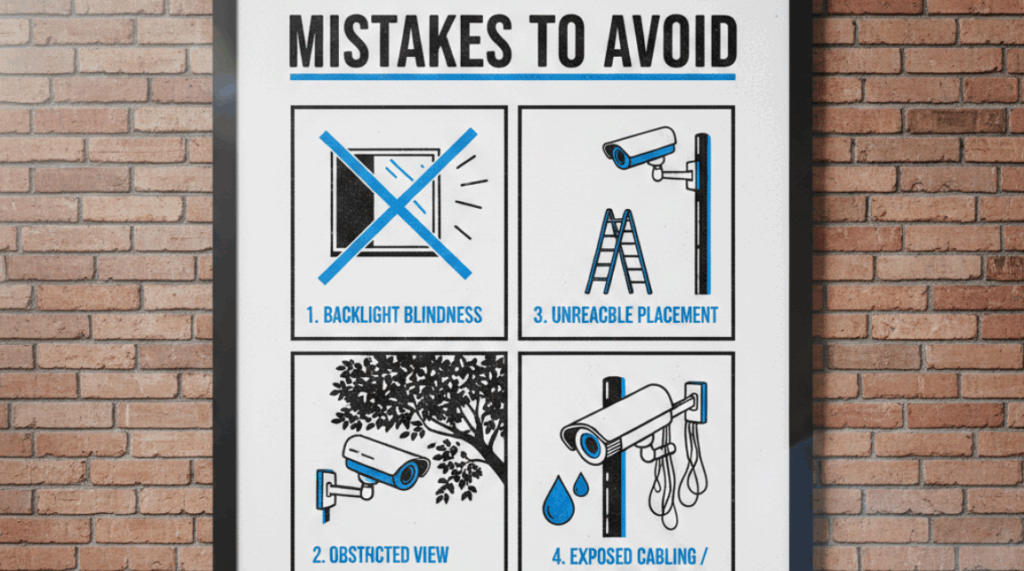
Even well‑funded systems fail when basic design mistakes undermine camera placement and image usefulness.
- The “hero camera” myth: Relying on a single “hero” camera to cover a large area often produces attractive wide shots but misses crucial detail where incidents actually occur.
- Impressive but useless angles: Mounting cameras too high or too far away can make footage look comprehensive while leaving faces, plates, and hand movements too small to be actionable.
- Ignoring changing light: Failing to account for shifting daylight, seasonal sun angles, and added light sources leads to glare, silhouettes, and blown‑out scenes that defeat identification.
- Design vs. real movement: Designing only from floor plans and forgetting how people really move—shortcuts, side doors, informal routes—creates blind spots in the very paths most used.
Conclusion
Well‑designed camera coverage comes from intentional planning around risk, movement, and lighting, not from installing as many devices as possible. When camera placement follows clear objectives—who must be identifiable, what activity matters, and how people move through each zone—video becomes a reliable tool instead of a decorative archive.
A practical next step is to review your current layout, walk key routes, and list a few high‑impact placement changes that would immediately close gaps. Efficient LowVolt Solutions can help by assessing your existing system, mapping views to real‑world risks, and recommending focused adjustments rather than unnecessary new hardware. This kind of expert review aligns cameras with access control, alarms, and network limits so your investment delivers the level of protection your business actually needs.